|
|
|
| |
|
|
|
|
|
Calendars are a great way to display your pictures. However, creating a typical twelve month calendar can be a bit repetitive since you have to perform the same set of operations twelve times. But if you use a workflow, you can define the steps just once and then apply them to twelve separate images. Not only does this save work, but because it's so much simpler, you can afford to be more elaborate in your calendar design.
About the Sample Calendar
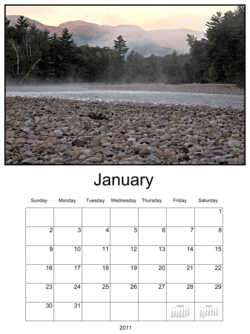
The calendar we created is shown at the left. The main month uses an appointment style. It also includes the last and next month in the bottom row. We chose to print the year at the bottom of the page. Another option would be to print it after the month. Notice too that the image is outlined with a narrow black border, to help 'hold it in' on the page. All of these decisions are matters of style. You can easily change any of them to suit your own needs and taste.
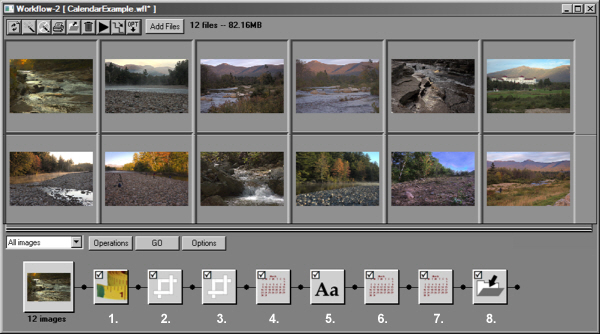
The workflow we used is shown below. You can download the 2011 version of it at the bottom of the page.
|
|
|
Using the Workflow
Start by downloading and opening the .wfl file in Picture Window. (You need PW version 5.0.1.6 or later.) This opens a workflow window and displays the workflow in it.
Drop twelve images into the upper part of the workflow window. Sort your images so they are in order of the months. (Click the Options button and choose Sort Manually. Arrange the images in the desired order by dragging them.)
Click on each of the widgets in turn to set them. Here are some notes on the settings.
1. Resize: This widget sizes all images to a uniform height. The size we chose is arbitrary. However, all other dimensions in the workflow are based on it, so if you change the image height you will have make compensations in the other settings as well.
2. Crop-AddBorder I: This widget creates a 15 pixel black border around each image.
3. Crop-AddBorder II: This widget is used to add space below the image for the calendar. We added a bottom border that was somewhat greater than the height of our image.
4. Calendar I: This widget creates the main month of the calendar. Use the style you like. The number of rows has been set to 6 to ensure that all months will be the same height and will therefore occupy the same position on the page. Increment start date is set to Yes.
5. Text: This widget is used to place the year at the bottom of the calendar. Another option is to use the month and year option in the main calendar. If you prefer that, you can delete the text widget.
6. Calendar II: This widget creates the previous month. Thus the start date is set one month earlier than that for the main calendar. We placed the month in the next to last cell of the main calendar. However many other placements are also possible.
7. Calendar III: This widget creates the next month and starts one month later than the main calendar.
8. Save File: This widget saves each calendar page. Set the folder path to suit your file system. The sequence number is used to differentiate the filenames of each of the months.
Downloading the Workflow
CalendarExample2011.wfl
(12 KB) Requires PW 5.0.1.6 or later.
1. Download the workflow file to your desktop or any other convenient location.
2. Use File/Open to open the workflow.
3. Save the workflow in the lower workflow window. This will place it into your default workflow folder.
You can now delete the download file and proceed to use the workflow.
|
|
|